


Unit testing is a software testing process in which individual software units or components are tested independently. A "unit" is the smallest testable unit of software, such as a function, method, or class. Unit testing ensures that each software unit meets its criteria.
Key components of unit testing are as follows:
Isolation: Every component is examined separately from the other components of the system, a process known as isolation testing. This facilitates finding and resolving bugs early in the process of development.
Automation: Because unit tests are typically automated, developers can run them frequently while working on a project. Automated tests helps in the speedy identification of problems and the timely delivery of developer feedback.
Fast Execution: Unit tests are expected to be fast, allowing developers to run them frequently without significant delays. This is important for maintaining a quick development cycle.
Repeatable: Unit tests should produce the same results every time they are run. This ensures that developers can rely on the test results and that issues are consistent.
Framework: Unit tests are often written using testing frameworks specific to the programming language, such as Jest, for JavaScript...
Coverage: Unit testing aims to achieve high code coverage, meaning that a significant portion of the code is tested by the unit tests.
The benefits of unit testing include:
Early Bug Detection: Early on in the development process, unit tests help in the discovery and correction of issues.
Simplified Debugging: If a test fails, it's easier to locate and fix the issue since the problem is isolated to a specific unit.
Code Quality: Unit testing encourages developers to write modular and maintainable code.
Regression Testing: As the software evolves, unit tests provide a safety net, helping to ensure that existing functionality is not broken by new changes.
Documentation: Unit tests can serve as documentation for how the code is intended to be used.
Modern software development relies heavily on unit testing, which is frequently used along with other testing approaches like acceptability, system, and integration testing.
Jest
Jest, an open-source JavaScript testing framework, is extremely popular within the React community. It includes a wide range of functionality such as creating fake functions for testing React component behavior, recording UI snapshots to detect changes or regressions, and validating user interaction flows.
One of its most notable characteristics is the ability for all tests to have a distinct global state, allowing concurrent execution without conflict. Jest's elegance rests in its extensive documentation and minimal configuration requirements, which make it an accessible and effective tool for testing JavaScript apps, particularly those created using React.
React Testing Library
The React Testing Library is a simple toolkit used for testing React components. It's not heavy or complicated. It works with parts of React that handle displaying components and testing them, so your components act just like they would on a real website.
There are several things you can accomplish with the React Testing Library:
Check that your components are displayed correctly.
Check if your components contain the correct information.
Evaluate how users engage with your components.
Understand how your components begin, run, and end.
RTL provides some extremely useful query functions that do most of the heavy lifting for you. For an in-depth overview, I suggest reading their API documentation.
Difference between Jest and the React Testing Library ?
Jest and React Testing Library can be used together because they serve different roles. Jest is a test runner. It searches for files ending .test.js or .test.jsx and executes each test. After running the tests, it will report whether the tests passed or failed, as well as why they failed.
On the other hand, React Testing Library includes functions that help you locate and interact with specific DOM nodes within the component being tested. These functions allow you to carry out operations like:
Rendering components.
Triggering events.
Waiting for certain conditions.
Accessing the screen.
NOTE : When you use npx create-react-app to create a new React application, Jest is set as the default testing framework, and React Testing Library is used to test React components;
However, with other tools like as Vite, Jest and React Testing Library are not included by default.
In that case you can manually add them to your project as dependencies if you want to use them for testing React components.
You can install Jest and React Testing Library using npm or yarn:
npm install --save-dev jest @testing-library/react @testing-library/jest-dom
or
yarn add --dev jest @testing-library/react @testing-library/jest-dom
Generally speaking, the best practice for writing unit tests often involves following the 'Three A's' principle.
Arrange: This stage includes setting up the test environment and configuring the starting data state required for the test. It's all about getting things ready for the test scenario.
Act: In this step, the test takes place out by invoking the appropriate function or method. This operation initiates the specific behavior or feature that has to be tested. It is about carrying out the action or operation under investigation.
Assert: After executing the test, this phase comprises ensuring that the outcome and any side effects are consistent with the expected results. It is about determining whether the output produced by the action corresponds to the expected outcome.
Here's an example to help you understand:
import React from "react";
import { render, screen } from "@testing-library/react";
import ContactDetails from "./ContactDetails";

test("renders Contact Details form component", async () => {
  // Arrange: We prepare the testing environment and rendering of the component.
  const { container } = render(<ContactDetails />);
  expect(container).toBeInTheDocument();

  // Act: Search for the Text that you are expecting.
  const contactDetailsHeader = screen.getByText("Contact details");

  // Access: Verify that the required text is present in the document.
  expect(contactDetailsHeader).toBeInTheDocument();
});
Here, we're creating a Contact Details form and writing the corresponding test cases
ContactDetails.jsx
import "../ContactDetails/ContactDetails.css";
import React from "react";
import { IoPersonOutline } from "react-icons/io5";
import { CiMail } from "react-icons/ci";
import { IoPhonePortraitOutline } from "react-icons/io5";
import { FaRegBuilding } from "react-icons/fa";
import NextButton from "../Button/NextButton";

const ContactDetails = (props) => {
  return (
    <>
      <div className="detail-container">
        <h1>Contact details</h1>
        <div className="detail-desc">
          Lorem ipsum dolor sit amet consectetur adipisc.
        </div>
        <div className="sub-container">
          <div className="input-container">
            <label >Name</label>
            <div className="input">
              <input type="text" placeholder="Your Name" data-testid="name"/>
              <IoPersonOutline className="icon" />
            </div>
          </div>
          <div className="input-container">
            <label>Email</label>
            <div className="input">
              <input type="email" placeholder="Your Email Address" data-testid="email"/>
              <CiMail className="icon" />
            </div>
          </div>
        </div>
        <div className="sub-container">
          <div className="input-container">
            <label>Phone Number</label>
            <div className="input">
              <input type="tel" maxLength={10} placeholder="Phone Number" data-testid="phone-num"/>
              <IoPhonePortraitOutline className="icon" />
            </div>
          </div>
          <div className="input-container">
            <label>Company Name</label>
            <div className="input">
              <input type="text" placeholder="Company Name" data-testid="company-name"/>
              <FaRegBuilding className="icon" />
            </div>
          </div>
        </div>
      </div>
      <div className="contact-btn">
        <NextButton onNext={props.onNext} />
      </div>
    </>
  );
};

export default ContactDetails;
contactDetails.test.jsx
import React from "react";
import { render, fireEvent, screen } from "@testing-library/react";
import ContactDetails from "./ContactDetails";

test("renders Contact Details form component", async () => {

  const { container } = render(<ContactDetails />);
  expect(container).toBeInTheDocument();

  const contactDetailsHeader = screen.getByText("Contact details");
  expect(contactDetailsHeader).toBeInTheDocument();

  const contactDetailsSpan = screen.getByText(
    "Lorem ipsum dolor sit amet consectetur adipisc."
  );
  expect(contactDetailsSpan).toBeInTheDocument();

  const name = screen.getByTestId("name");
  fireEvent.change(name, { target: { value: "test123" } });

  const email = screen.getByTestId("email");
  fireEvent.change(email, { target: { value: "username@gmail.com" } });

  const phoneNumber = screen.getByTestId("phone-num");
  fireEvent.change(phoneNumber, { target: { value: "1111100000" } });

  const companyName = screen.getByTestId("name");
  fireEvent.change(companyName, { target: { value: "Enterprise" } });

  const nextBtn = screen.getByRole("button");
  expect(nextBtn).toBeInTheDocument();
  fireEvent.click(nextBtn);
});
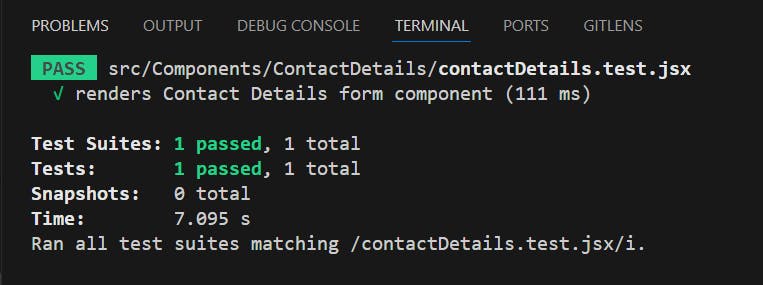
Now run the following command in your terminal to see the test result:
npm run test
Result:
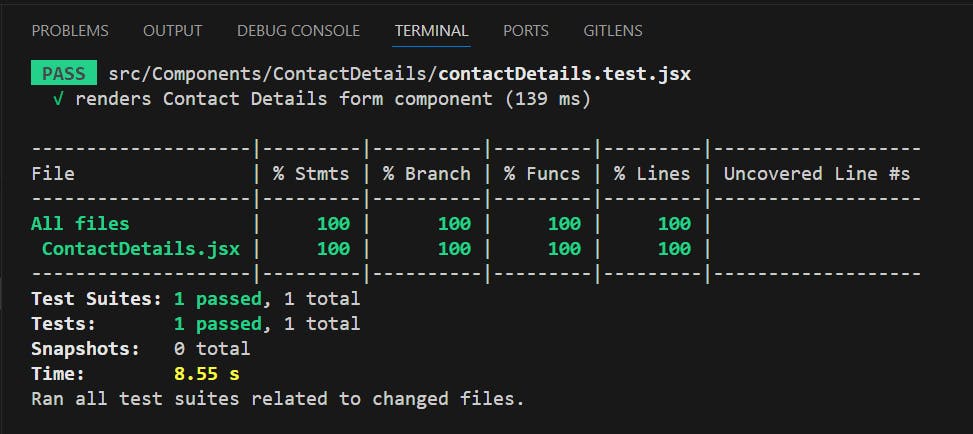
Or you can run the following command to see the file coverage:
npm run test -- --coverage
Result:
Conclusion:
To save maintenance and support costs, you should make sure your application is robust, especially for large-scale projects. This blog explores the process of using TypeScript, React, and Jest to create unit tests. The development of new parts and the testing that go along with them is emphasized as a way to strengthen the application's dependability.
I hope you like my blog and found it informative. Thank you......